什麼是AWStats ?
AWStats 是一個免費強大而有個性的工具,帶來先進的網絡、流量、FTP或郵件服務器統計圖。本日誌分析器作為CGI或從命令行在數個圖形網頁中顯示日誌中包含的所有可能信息。利用一部分檔案資料就能經常很快地處理大量日誌檔案,能分析日誌文件來自從各大服務器工具,如Apache日誌檔案 (NCSA combined/XLF/ELF log format or common/CLF log format),WebStar,IIS (W3C的日誌格式)及許多其他網站,Proxy(代理服務器)、Wap、流量服務器、郵件服務器和一些FTP服務器。
可以統計網站資訊如下:
一:訪問量,訪問次數,頁面瀏覽量,點擊數,數據流量等
二:精確到每月、每日、每小時的數據
三:訪問者國家
四:訪問者IP
五:Robots/Spiders的統計
六:訪客持續時間
七:對不同Files type 的統計信息
八:Pages-URL的統計
九:訪客操作系統瀏覽器等信息
十:其它信息(搜索關鍵字等等)
詳細說明可參考AWStats官網
系統環境
Centos 5.8
AWStats 7.0
設定
1. 安裝AWStats
到官網下載最新版本的AWStats或到本站提供的載點下載AWStats7.0
1.1 下載AWStats
|
1 2 |
[root@localhost ~]# cd /opt/ [root@localhost ~]# wget http://sourceforge.net/projects/awstats/files/AWStats/7.0/awstats-7.0.tar.gz/download |
1.2 解壓縮且搬移存放路徑
因為AWStats是由perl編寫,習慣安裝路徑為/usr/local/awstats
|
1 2 |
[root@localhost ~]# tar -zxvpf /opt/awstats-7.0.tar.gz [root@localhost ~]# mv awstats-7.0 /usr/local/awstats |
1.3 安裝AWStats
|
1 2 3 4 5 6 7 8 9 10 11 12 13 14 15 16 17 18 19 20 21 22 23 24 25 26 27 28 29 30 31 32 33 34 35 36 37 38 39 40 41 42 43 44 45 46 47 48 49 50 51 52 53 54 55 56 57 58 59 60 61 62 63 64 65 66 67 68 69 70 71 72 73 |
[root@localhost ~]# cd /usr/local/awstats/tools [root@localhost ~]# perl awstats_configure.pl ----- AWStats awstats_configure 1.0 (build 1.9) (c) Laurent Destailleur ----- This tool will help you to configure AWStats to analyze statistics for one web server. You can try to use it to let it do all that is possible in AWStats setup, however following the step by step manual setup documentation (docs/index.html) is often a better idea. Above all if: - You are not an administrator user, - You want to analyze downloaded log files without web server, - You want to analyze mail or ftp log files instead of web log files, - You need to analyze load balanced servers log files, - You want to 'understand' all possible ways to use AWStats... Read the AWStats documentation (docs/index.html). -----> Running OS detected: Linux, BSD or Unix -----> Check for web server install Enter full config file path of your Web server. Example: /etc/httpd/httpd.conf Example: /usr/local/apache2/conf/httpd.conf Example: c:\Program files\apache group\apache\conf\httpd.conf Config file path ('none' to skip web server setup): >/etc/httpd/conf/httpd.conf # 輸入web server 設定檔的路徑 -----> Check and complete web server config file '/etc/httpd/conf/httpd.conf' All AWStats directives are already present. -----> Update model config file '/usr/local/awstats/wwwroot/cgi-bin/awstats.model.conf' File awstats.model.conf updated. -----> Need to create a new config file ? Do you want me to build a new AWStats config/profile file (required if first install) [y/N] ? y # 詢問是否要產生新的AWStats 設定檔,輸入y 產生一個新的設定檔 -----> Define config file name to create What is the name of your web site or profile analysis ? Example: www.mysite.com Example: demo Your web site, virtual server or profile name: > www.faq-test.tk # 輸入要分析的域名,以便日後好管理 -----> Define config file path In which directory do you plan to store your config file(s) ? Default: /etc/awstats Directory path to store config file(s) (Enter for default): > # 按下Enter,使用預設資料夾來放置設定檔 -----> Create config file '/etc/awstats/awstats.www.faq-test.tk.conf' Config file /etc/awstats/awstats.www.faq-test.tk.conf created. -----> Add update process inside a scheduler Sorry, configure.pl does not support automatic add to cron yet. You can do it manually by adding the following command to your cron: /usr/local/awstats/wwwroot/cgi-bin/awstats.pl -update -config=www.faq-test.tk Or if you have several config files and prefer having only one command: /usr/local/awstats/tools/awstats_updateall.pl now Press ENTER to continue... # 按下Enter 繼續 A SIMPLE config file has been created: /etc/awstats/awstats.www.faq-test.tk.conf You should have a look inside to check and change manually main parameters. You can then manually update your statistics for 'www.faq-test.tk' with command: > perl awstats.pl -update -config=www.faq-test.tk You can also read your statistics for 'www.faq-test.tk' with URL: > http://localhost/awstats/awstats.pl?config=www.faq-test.tk Press ENTER to finish... # 按下Enter 完成 |
2. 修改權限且啟動服務
|
1 2 3 4 5 |
[root@localhost ~]# chown root.root -R /usr/local/awstats [root@localhost ~]# chmod 755 -R /usr/local/awstats [root@localhost ~]# mkdir /var/lib/awstats [root@localhost ~]# /etc/init.d/httpd start [root@localhost ~]# chkconfig httpd on |
3. 修改設定檔
Conf設定檔會依照安裝時所設定的域名來命名
在設定檔的部份請依照個人需求修改設定
3.1 一般設定
|
1 2 3 4 5 6 7 8 9 10 11 12 13 14 15 16 17 18 19 20 21 22 23 24 25 26 27 28 |
[root@localhost ~]# vim /etc/awstats/awstats.www.faq-test.tk.conf LogType=W # W代表分析類型為web log files # F代表分析類型為Vsftp log files # M代表分析類型為sendmail log files LogFormat=4 # 1 - Apache or Lotus Notes/Domino native combined log format (NCSA combined/XLF/ELF log format) # 2 - IIS or ISA format (IIS W3C log format). See FAQ-COM115 For ISA. # 3 - Webstar native log format. # 4 - Apache or Squid native common log format (NCSA common/CLF log format)With LogFormat=4, some features (browsers, os, keywords...) can't work. SiteDomain="www.faq-test.tk" # 指定定從log檔中過濾符合SiteDomain的記錄(不同的Virtual Domain就須指定為不同的SiteDomain) HostAliases=" faq-test.tk www.faq-test.tk 127.0.0.1 localhost" # 指定哪些Domain為Local,其餘皆視為External DirData="/var/lib/awstats" # 設置awstats的資料庫存放目錄,可自行修改路徑 DNSLookup=0 # 0-不解析 # 1-永遠解析 # 2-特定解析--選此還需手動新增解析的位置預設檔案為 dnscache.txt AllowToUpdateStatsFromBrowser=0 # 預設為0,如果想要在瀏覽器上能點擊”Update now”的話要將此設定改為1 |
3.2 LOG 設定
|
1 2 3 4 5 6 7 8 9 10 11 12 13 14 |
[root@localhost ~]# vim /etc/awstats/awstats.www.faq-test.tk.conf #修改前 LogFile="/var/log/httpd/mylog.log" # 可自行定意access.log所要存放的路徑,若此處修改的話要記得httpd.conf也要修改LOG儲存位置。若不知如何設定的話可參考以下設定 #修改後 LogFile="/var/log/httpd/access_log" # 多LOG合併分析處理: LogFile="/opt/awstats/tools/logresolvemerge.pl /var/log/httpd/01.access_log /var/log/httpd/02.access_log|" # 或 LogFile="/opt/awstats/tools/logresolvemerge.pl /var/log/httpd/*.access_log|" # 分析gzip壓縮的log LogFile="gzip -d </var/log/httpd/access.log.gz|" |
3.3 關鍵字設定
若沒設定此步骤的話,在查看關鍵字的話會是亂碼
|
1 2 3 4 5 6 |
[root@localhost ~]# vim /etc/awstats/awstats.www.faq-test.tk.conf #修改前 #LoadPlugin="decodeutfkeys" #修改後 (將#去掉) LoadPlugin="decodeutfkeys" |
3.4 語系設定
在AWStats內鍵就有不少語系的選擇,可自行設定
|
1 2 3 4 5 6 7 8 9 10 11 12 13 14 15 16 17 18 19 |
# 語系選擇可參考此路徑 [root@localhost ~]# ls /usr/local/awstats/wwwroot/cgi-bin/lang awstats-al.txt awstats-cz.txt awstats-gr.txt awstats-lv.txt awstats-si.txt awstats-ar.txt awstats-de.txt awstats-he.txt awstats-mk.txt awstats-sk.txt awstats-ba.txt awstats-dk.txt awstats-hr.txt awstats-nb.txt awstats-sr.txt awstats-be.txt awstats-en.txt awstats-hu.txt awstats-nl.txt awstats-th.txt awstats-bg.txt awstats-es.txt awstats-id.txt awstats-nn.txt awstats-tr.txt awstats-br.txt awstats-et.txt awstats-is.txt awstats-pl.txt awstats-tw.txt awstats-bzg.txt awstats-eu.txt awstats-it.txt awstats-pt.txt awstats-ua.txt awstats-ca.txt awstats-fi.txt awstats-jp.txt awstats-ro.txt tooltips_f awstats-cn.txt awstats-fr.txt awstats-ko.txt awstats-ru.txt tooltips_m awstats-cy.txt awstats-gl.txt awstats-lt.txt awstats-se.txt tooltips_w [root@localhost ~]# vim /etc/awstats/awstats.www.faq-test.tk.conf # 修改前 Lang="auto" # 修改後(繁體中文) Lang="tw" |
由於語系都為big5,如果要轉換為UTF-8的可參考以下方式
|
1 2 3 |
[root@localhost ~]# cd /usr/local/awstats/wwwroot/cgi-bin/lang [root@localhost ~]# cp awstats-tw.txt awstats-tw.txt.big5 [root@localhost ~]# iconv -f BIG5 -t UTF-8 awstats-tw.txt.big5 > awstats-tw.txt |
4. AWStats資料庫初始化
|
1 2 3 4 5 6 7 8 9 10 11 12 13 |
[root@localhost ~]# /usr/local/awstats/wwwroot/cgi-bin/awstats.pl -config=www.yourdomain.com.tw -update Create/Update database for config "/etc/awstats/awstats.www.faq-test.tk.conf" by AWStats version 7.0 (build 1.971) From data in log file "/var/log/httpd/access_log"... Phase 1 : First bypass old records, searching new record... Searching new records from beginning of log file... Jumped lines in file: 0 Parsed lines in file: 0 Found 0 dropped records, Found 0 comments, Found 0 blank records, Found 0 corrupted records, Found 0 old records, Found 0 new qualified records. |
5. 測試
第一次測試,因為是新的所以沒有任何資料。
URL : http://IP/awstats/awstats.pl?config=www.yourdomain.com.tw
6. 設定AWStats登入驗證
6.1 設定登入帳密
htpasswd -cb 檔名 帳號 密碼
|
1 2 |
[root@localhost ~]# htpasswd -cb /etc/httpd/conf/htpasswd admin 123456 Adding password for user admin |
6.2 設定awstats.conf
AuthUserFile /etc/httpd/conf/htpasswd 設定帳密存放的路徑
加入以下的內容
|
1 2 3 4 5 6 7 8 9 10 11 |
[root@localhost ~]# vi /etc/httpd/conf.d/awstats.conf <Directory "/usr/local/awstats/wwwroot"> Options None AllowOverride None Order allow,deny Allow from all AuthType BASIC AuthName "Monitor" AuthUserFile /etc/httpd/conf/htpasswd Require Valid-User </Directory> |
6.3 重啟服務
|
1 |
[root@localhost ~]# /etc/init.d/httpd restart |
6.4 登入
設定完成後登入網頁就會看到需要輸入帳密的提示
7. 更新
7.1 設定排程定時更新
|
1 2 |
[root@localhost ~]# crontab -e 0 1 * * * root /usr/local/awstats/tools/awstats_updateall.pl now |
7.2 手動更新
|
1 2 3 4 5 |
# 更新單一網址 [root@localhost ~]# /usr/local/awstats/wwwroot/cgi-bin/awstats.pl -config=www.yourdomain.com.tw -update # 更新全部 [root@localhost ~]# /usr/local/awstats/tools/awstats_updateall.pl now |
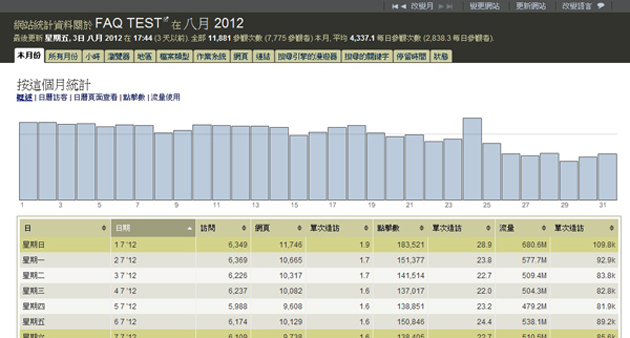
8. 以下為倒入數據後的圖示(提供參考)






評論
此文章尚無評論。