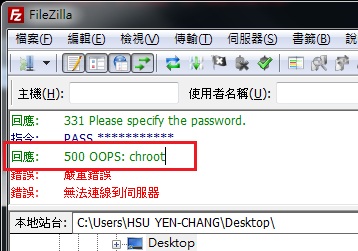
vsftpd 的全名是『Very Secure FTP Daemon 』
vsftpd 擁有兩種啟動的方式,分別是一直在監聽的【stand alone】 ,
一種則是透過 xinetd 這個 【super daemon】 來管理的方式。
在CentOS上預設都是用Stand alone來啟動的。
兩種vsftpd的使用時機為 :
【stand alone】: 如果你的ftp伺服器是提供給整個網際網路來進行大量下載的任務,例如公
家機關,或各大學校的 FTP 伺服器,那建議你使用stand alone 的方式,
服務的速度上會比較好
【super daemon】: 如果只是提供給公司內部人員使用的FTP,那使用super daemon來
管理就可以了
在【stand alone】中又可分為【stand alone-實體用戶】和【super daemon-匿名用戶】
這邊先介紹【super daemon】
一開始先檢查是否有安裝vsftp
|
[root@localhost ~]# rpm -q vsftpd vsftpd-2.0.5-16.el5_4.1 |
如果你的 CentOS 沒有安裝, 請利用 yum install vsftpd 來安裝他
【Super daemon】的設定方式
如果FTP較少在使用的情況下,可考慮使用Super daemon,在Super daemon管理部份就要自行修改設定檔。
|
[root@localhost ~]# vi /etc/vsftpd/vsftpd.conf #找到這一行 listen=YES #把YES改成NO listen=NO |
接下來修改設定檔,但是底下設定檔必須要自己新增才行。(基本設定)
有關設定檔內容的部份可參考【Super daemon設定檔語法說明 】
|
[root@localhost ~]# vi /etc/xinetd.d/vsftpd service ftp { socket_type = stream wait = no user = root server = /usr/sbin/vsftpd log_on_success += DURATION USERID log_on_failure += USERID nice = 10 disable = no } |
設定後在重新啟動試試看
|
[root@localhost ~]# /etc/init.d/vsftpd stop [root@localhost ~]# /etc/init.d/xinetd restart [root@localhost ~]# netstat -tulnp| grep 21 tcp 0 0 0.0.0.0:21 0.0.0.0:* LISTEN 4308/ xinetd |
stand alone和supe daemon啟動的模式是不一樣的。相對的在管理上也會有所不同。請不要同時兩種模式一起啟動,容易會有問題。
額外管理項目(一些簡單基本會用的的設定)
再次的提醒如果是使用Super daemon來管理vsftp的話。請先去/etc/vsftpd/vsftpd.conf修改『listen』
|
[root@localhost ~]# vi /etc/xinetd.d/vsftpd # vsftpd is the secure FTP server. { disable = no socket_type = stream wait = no user = root server = /usr/sbin/vsftpd # 上面這個server的設定請依照主機環境來設定 server_args = /etc/vsftpd/vsftpd.conf # server_args 請寫入vsftpd的設定檔完整檔名即可 per_source = 5 #和同IP的連線數目有關 instances = 200 #同一時間最多的連線數目 no_access = 192.168.1.3 banner_fail = /etc/vsftpd/vsftpd.busy_banner #此檔案就是當主機忙碌時, 在Client端顯示的內容 log_on_success += PID HOST DURATION log_on_failure += HOST } [root@localhost ~]# vi /etc/vsftpd/vsftpd.conf #再來一樣確定此檔案的內容是否有修改 listen=NO [root@localhost ~]# vi /etc/vsftpd/vsftpd.busy_banner #此檔可用來當主機忙碌時,在Client顯示的內容 421 目前伺服器上線人數過多,請稍後在試,謝謝 #421為錯誤代碼 [root@localhost ~]# /etc/init.d/vsftpd stop #先把服務停掉 [root@localhost ~]# /etc/init.d/xinetd restart #再重新啟動xinetd |
= : 表示後面的設定參數就是這樣啦!
+= : 表示後面的設定為『在原來的設定裡頭加入新的參數』
-= : 表示後面的設定為『在原來的參數捨棄這裡輸入的參數!』
防火牆設定
在防火牆中加入下面這一段
連線的設定
|
[root@localhost ~]# vi /etc/sysconfig/iptables iptables -A INPUT -p TCP -i $EXTIF --dport 21 -j ACCEPT |
在防火牆設定部份也可參考此篇 【
參考文獻 :
鳥哥Linux 架站文件 【vsFTPd Server】


It’s really a nice and helpful piece of information. I’m glad that you shared this helpful info with us. Please keep us informed like this. Thanks for sharing.
this post is very usefull thx!
Pretty nice post. I just stumbled upon your blog and wanted to say that I have really enjoyed browsing your blog posts. In any case I’ll be subscribing to your feed and I hope you write again soon!
I hope to help you that by my blog